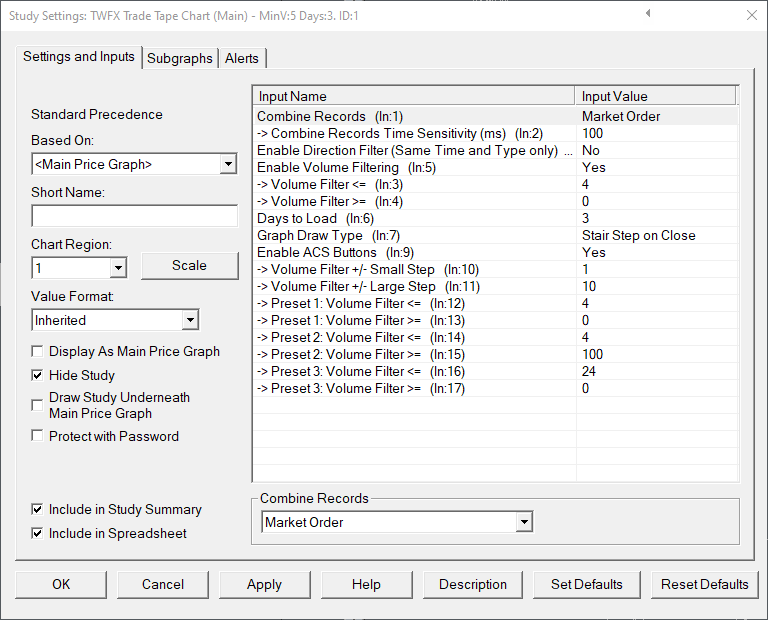
Configuration options are provided, enabling different combining and filtering methods to be applied to the trade data.
A selection of support studies are provided with the Trade Tape Chart study, allowing additional information displayed and configured.
The study is summarised in the following update post – Reconstructed Tape Chart.
Note:
- This study can only be used on charts with a chart data type of ‘Intraday Chart‘
- It is requireded to use ‘Intraday Data Storage Time Unit‘ setting ‘1 Tick’
Inputs
- Use Only Chart Setting:
Trade records are displayed as determined by the chart setting ‘Combine Trades into Original Summary Trade’ (https://www.sierrachart.com/index.php?page=doc/ChartSettings.html#CombineTradesIntoOriginalSummaryTrade)
NOTE:
The Combine Trades into Original Summary Trade option applies only to CME data provided by the Sierra Chart Denali data feed, in any other case this setting has no effect.
Depending on the chart setting and date feed / exchange being used, each chart bar will either represent a single matched limit order-market order trade or a market order trade matched against multiple limit orders. - Same Time and Price:
Sequences of trade records are combined if the following conditions are met:- Trade price is identical;
- Trade type is identical (i.e. Ask or Bid);
- Trade occurs within the time window defined by ‘Combine Records Time Sensitivity (ms)’, relative to the first combined trade.
- Same Time and Type:
Sequences of trade records are combined if the following conditions are met:- Trade type is identical (i.e. Ask or Bid);
- Trade occurs within the time window defined by input 2 – Combine Records Time Sensitivity (ms) – relative to the first combined trade.
- Market Order:
Sequences of trades are only combined under the following conditions:- When each ask (bid) trade occurs at a higher (lower) price than the previous trade in the sequence; and
- There are no ask / bid price updates received in between the trades (as this would indicate that the trades are not part of the same summary trade); and
- Only the first trade at a price level is considered to be part of the original order, i.e. once 2 or more trades occur at a price level, the original order sequence is considered completed and any remaining orders that transact before an ask / bid price update is received are considered to be part of separate trades (resting buy / sell stop orders) triggered subsequent to the first trade.
NOTE:
For best results it is recommended to use the Sierra Chart Denali data feed, and enable the ‘Combine Trades into Original Summary Trade’ feature (CME data only).
NOTE:
When using the ‘Same Time and Type’ option, trades occurring across multiple price levels can be combined.
When using either ‘Same Time and Price’ or ‘Same Time and Type’, the chart setting ‘Combine Trades into Original Summary Trade’ will also be considered.
Defines the size of the time window in which trades can be combined, relative to the first combined traded.
Applies only to combining options ‘Same Time and Price’ and ‘Same Time and Type’.
- Min: 1ms
- Max: 1000ms
When Direction Filter is enabled and ‘Combine Records’ is set to ‘Same Time and Type’, in addition to the existing combining parameters, a trade sequence will be considered complete if an ask (bid) trade transacts at a lower (higher) price compared to the previous ask (bid) trade.
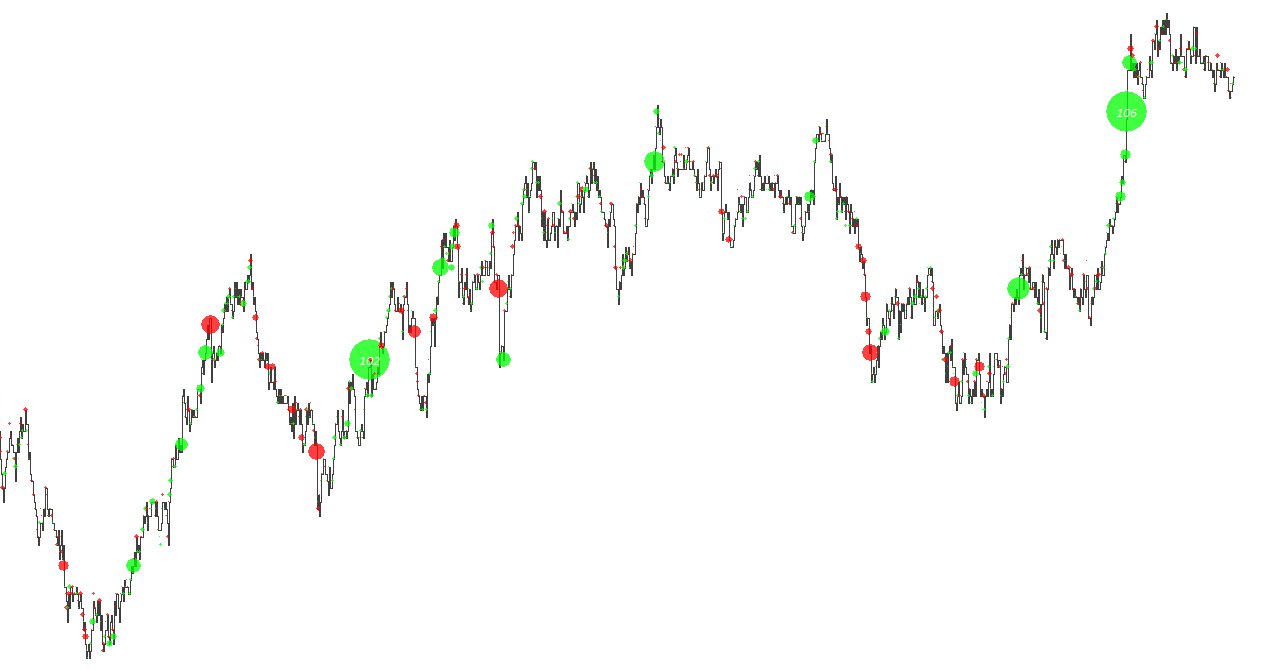
Enable Volume Filtering (In:5)
When Volume Filtering is enabled, trade records are filtered according to the ‘Volume <=’ and ‘Volume >=’ conditions.
NOTE:
Volume filtering occurs after any combining operations have been performed.
this volume filtering overrides the built in Sierra Chart volume filtering functionality, and as such any changes to the Chart Volume Filter Settings will be ignored, refer – https://www.sierrachart.com/index.php?page=doc/ChartSettings.html#VolumeFilter
Volume <= (In:3)
Defines the minimum volume filter value.
- Min: 0 (0 = Ignore)
- Max: 1000000
Volume >= (In:4)
Defines the maximum volume filter value.
- Min: 0 (0 = Ignore)
- Max: 1000000
Days to Load (In:6)
Defines the number of days worth of data to load when building the chart.
NOTE:
This setting overrides the built in ‘Days to Load’ setting (https://www.sierrachart.com/index.php?page=doc/ChartSettings.html#DaysToLoad)
- Min: 1
- Max: 1095
Graph Draw Type (In:7)
Defines the draw type used for the main chart display.
The available draw types are explained at the following location – https://www.sierrachart.com/index.php?page=doc/PriceGraphTypes.html
NOTE:
This setting overrides the built in ‘Graph Draw Type’ setting (https://www.sierrachart.com/index.php?page=doc/ChartSettings.html#GraphDrawType), as some of the available Draw Types are not suited to displaying the Trade Tape Chart Study.
Enable ACS Buttons (In:9)
When enabled, ACS Buttons 100-118 are automatically configured to provide quick access to certain aspects of Trade Tape Chart functionality.
ACS Buttons can be added to any of control bar 1-8 by following the instructions provided here.
Volume Filter +/- Small Step (In:10)
Defines the small step quantity used when increasing / decreasing the Volume Filter setting via ACS control bar buttons
- Min: 1
- Max: 9
Volume Filter +/- Large Step (In:11)
Defines the large step quantity used when increasing / decreasing the Volume Filter setting via ACS control bar buttons
- Min: 10
- Max: 100
Preset 1: Volume Filter <= (In:12)
Defines the ‘Volume Filter <=’ quantity for ACS Button ‘Preset #1’
- Min: 0
- Max: 1000000
Preset 1: Volume Filter >= (In:13)
Defines the ‘Volume Filter >=’ quantity for ACS Button ‘Preset #1’
- Min: 0
- Max: 1000000
Preset 2: Volume Filter <= (In:14)
Defines the ‘Volume Filter <=’ quantity for ACS Button ‘Preset #2’
- Min: 0
- Max: 1000000
Preset 2: Volume Filter >= (In:15)
Defines the ‘Volume Filter >=’ quantity for ACS Button ‘Preset #2’
- Min: 0
- Max: 1000000
Preset 3: Volume Filter <= (In:16)
Defines the ‘Volume Filter <=’ quantity for ACS Button ‘Preset #3’
- Min: 0
- Max: 1000000
Preset 3: Volume Filter >= (In:17)
Defines the ‘Volume Filter >=’ quantity for ACS Button ‘Preset #3’
- Min: 0
- Max: 1000000